


Plastic injection molding is one of the most common methods used to make plastic products. From small bottle caps to large parts, this process enables the rapid and cost-effective production of thousands of parts. But like any production method, it is not without its challenges. One of the biggest challenges manufacturers deal with is plastic injection molding defects.
These defects can appear in many ways, such as marks on the surface, uneven shapes, or weak spots. They often reduce the quality of the final product. But the good news is that you can control or prevent most defects once you know their causes. Want to know how? This article will explore some of those common defects and their solutions. So let’s get started!
Types of Plastic Injection Molding Defects & Their Solutions
In the world of manufacturing, defects are unavoidable but manageable. Every defect tells a story about what went wrong in the molding process. If not addressed at the time, these defects can cause significant issues in the overall production process. So let’s drill down and explore the most common plastic injection molding defects and see how they can be fixed.
1- Flash
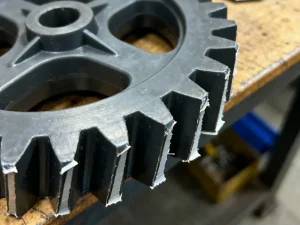
Flash is one of the most common plastic injection molding defects. It happens when excess molten plastic escapes from the mold cavity. As a result, a thin, unwanted layer is formed along the edges of the product. This extra material resembles a small fin or thin sheet protruding from the part known as flash.
Sometimes the flash is so small and barely visible. However, in other cases, it can be sharp, thick, and clearly noticeable. Flash usually occurs when the mold is not tightly closed during the injection process. Since plastic is injected at high pressure, even a tiny gap allows it to leak out.
Solution: First, you should ensure the mold halves stay firmly shut during injection. If needed, increase the clamping force. Moreover, regularly inspect molds for wear and repair or replace them when needed. Lastly, lowering the injection pressure and temperature can reduce leakage. Reduced leakage means no flash.
2- Sink Marks
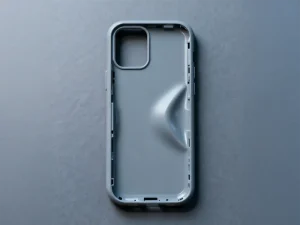
Sink marks are minor dents or shallow depressions that appear on the surface of a molded product. They usually look like tiny sunken spots, and you can find them mainly on the thicker areas of the parts. Sink marks might not always affect the strength of the product. However, they definitely harm the look and feel of the products.
If we discuss its causes, sink marks mostly occur due to uneven cooling or shrinkage of the plastic. When the molten plastic cools, it shrinks slightly. If some areas of the product are thicker than others, those areas shrink more, causing dents on the surface.
Solution: First of all, you should increase holding pressure and time. This ensures enough plastic stays in the mold to fill any shrinking gaps. Moreover, you must avoid overly thick areas in product design to reduce uneven shrinkage. Lastly, improved cooling channels in the mold help the plastic cool evenly, which reduces sink marks.
3- Weld Lines
Weld lines are thin, visible lines or marks that appear on injection-molded parts. They form when two separate flows of molten plastic meet inside the mold but do not fully bond together. Instead of blending into one smooth flow, the two flows leave behind a weak line. These lines can look like faint streaks, hairline cracks, or scratches known as weld lines.
Weld lines significantly impact the polished appearance of consumer products. Moreover, due to improper joining of two flows, the bond in that area is weak. This makes the part more likely to break under stress. Weld lines usually form when there are multiple gates in the molds. It can also occur when the plastic has to flow around obstacles such as pins or inserts.
Solution: To prevent weld lines, you should increase the melt and mold temperature. Hotter plastic flows better and merges more strongly. Moreover, you must raise the injection speed or pressure. The reason is that faster filling helps the plastic flows meet without cooling too quickly.
4- Burn Marks
Burn marks are dark spots, streaks, or blackened areas you can find on the molded part. They usually show up near the edges or at points where two plastic flows meet. At first glance, they appear to be the result of overheating, which is why they are called burn marks.
These marks can cause functional issues, such as making the part brittle and less durable. Burn marks occur mainly because of trapped gases or excessive heat. When air cannot escape, it gets compressed and burns the plastic. Moreover, inadequate vents in the mold prevent gases from escaping, which can cause the part to burn.
Solution: You can control burn marks with proper venting. For example, you can add or enlarge vents in the mold so that trapped air and gases can escape. Further lowering the melt and barrel temperature also stops the plastic from overheating or degrading.
5- Warpage
Warpage is a defect where a molded part bends, twists, or curves instead of keeping its proper shape. In other words, after cooling, the product doesn’t come out flat or straight but looks distorted. For example, you molded a flat plastic tray. This warpage defect can cause the tray edges to curl upward or downward.
Remember, warpage directly affects the usability of the product and injection molding tolerance. If the shape is not correct, the part may not fit with other components during assembly. Warpage typically occurs due to uneven shrinkage of plastic during the cooling process. The uneven cooling causes one side of the part to cool faster than the other, pulling the shape out of balance.
Solution: You can control the warpage by controlling processing and design factors. You should ensure that the cooling channels in the mold are well designed so that all parts cool evenly. Moreover, you must balance the mold design and avoid thickness differences, i.e., keep part walls uniform.
6- Voids and Bubbles
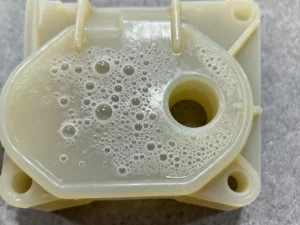
Voids and bubbles are the empty spaces or air pockets inside the molded part. A void is usually a small hole or hollow spot trapped inside the material. However, a bubble is a round air pocket that can sometimes be seen on the surface. Both of these defects weaken the part because they reduce its density and strength.
They also ruin the appearance, making the product look cheap or poorly made. The primary cause of these defects is trapped air, gas, or improper cooling. Moreover, if raw plastic pellets contain moisture, it turns into steam during molding, forming bubbles.
Solution: To prevent this defect, both material preparation and process settings need attention. For instance, you should always dry raw plastic properly before molding to remove moisture. Further, increase packing pressure to push out air and fill the cavity fully.
7- Jetting
Jetting is another common problem that occurs in different types of injection molding. It is a defect where the molten plastic shoots into the mold cavity like a jet of liquid instead of flowing smoothly. This causes a snake-like, wavy pattern on the surface of the molded part. Jetting mainly affects the appearance of the product.
In some cases, these streaks also show that the plastic did not fill the cavity appropriately. This may directly affect the strength and durability of the parts. Jetting mainly happens when plastic is forced in too fast, creating a jetting effect. Additionally, if the gate directs the flow straight into open space instead of against a mold wall, jetting occurs.
Solution: Modifying the gate design or location is the best solution to prevent jetting. You should place the gate where molten plastic hits a wall or surface first, allowing it to spread evenly. Moreover, slow down the injection so that the material flows smoothly, rather than shooting forward.
8- Discoloration
Discoloration is a defect where the molded plastic part shows unwanted or uneven colors. Instead of having a uniform shade, the product may have patches or completely different tones. Due to this defect, the part looks patchy, faded, or off-color, and doesn’t appear professional or high quality. Sometimes it also shows that the plastic used in the molding has degraded.
The degraded plastic will create less durable parts. This defect happens when something goes wrong during material preparation. For example, if the plastic pellets are mixed with dirt, dust, or different materials, the color becomes uneven. Moreover, wet plastic material can also cause color changes after heating.
Solution: To prevent this problem, you should use clean material. Make sure raw plastic pellets and colorants are free from dust or contamination. Also, when preparing materials, mix the pigments evenly to get a consistent shade.
9- Delamination
Delamination is another defect in which thin layers of plastic separate from the surface of the molded part. Instead of being one solid and smooth, you will notice that the product looks layered, with weak sheets coming off. It often feels rough to the touch, and if scratched or bent, the layers may easily peel away.
Remember that this defect not only makes the part unattractive but also affects its strength. HOW? Actually, delamination reduces mechanical strength, since the layers are not bonded properly. Parts with this defect can crack or break when put under stress. The leading cause behind this defect is poor bonding during the molding process.
Solution: To avoid delamination, you should first keep the material clean and dry the resin completely. Moreover, it is far better to use compatible materials. You should make sure the plastic and additives are designed to work together. Lastly, you should keep the injection mold warm enough for proper bonding and fusion.
10- Overpacking
Last but not least, overpacking happens when too much plastic material is forced into the mold cavity. Instead of just filling the space needed to form the part, excess plastic gets packed in. This causes stress, distortion, or visible surface problems. Overpacking can create several problems. For example, when too much plastic is forced in, the part holds high internal pressure.
This can lead to cracks, warping, or breakage in the future. If we discuss its causes, the primary one is excessive packing pressure. If packing pressure is set too high, the machine forces more material than needed into the cavity. Moreover, if the gate is too small, pressure can build up unevenly, causing overpacking in certain areas.
Solution: To avoid this defect, you should first adjust machine settings. For example, reduce packing pressure to the correct level. Also, optimize injection speed to ensure smooth but controlled filling. Moreover, improving the mold design can also reduce this defect. For instance, use properly sized mold gates that allow balanced filling without excess pressure.
Frequently Asked Questions
Can all defects in injection molding be eliminated entirely?
No, not always! While many defects can be reduced or prevented with proper control, some minor imperfections may still occur. Your goal should be to keep them within acceptable limits.
Can recycled plastics be used without increasing defects?
Yes, but only if handled carefully. Actually, recycled plastic might have contamination. So it must be cleaned, dried, and mixed properly to avoid quality issues.
How do manufacturers detect defects in molded parts?
Different defects can be detected in various ways. For example, some defects can be detected visually. However, some require advanced methods, such as X-ray and ultrasonic testing, to detect hidden issues.
Conclusion
Injection molding is one of the most widely used production methods. However, like any other, it is not always perfect, and you can face several defects. Defects in plastic injection molding may look like minor surface flaws. However, in reality, they can affect everything from product strength to customer trust.
In this article, I have explored some of the common defects you can face in injection molding. For example, sometimes, it may be weld lines, warpage, jetting, or delamination, and so on. But the key point is that these problems are not permanent barriers. With the proper adjustments and right solutions, you can reduce or even entirely avoid it.
